Arduino: Buzzer ile Ses Çıkarmak
Bu projemizde Buzzer ile çeşitli notaları arka arkaya çıkararak bir melodi oluşturacağız.
Buzzer Nedir?
Buzzer için minik bir hoparlör benzetmesi yapabiliriz.
Tam olarak hoparlör demek doğru olmayacaktır. Çünkü Buzzer, hoparlör kadar detaylı sesler üretemez. Ses seviyesi de hoparlör kadar yüksek değildir.
Peki, Buzzer ile ne yapabiliriz? Buzzer genellikle çeşitli tonlarda bip sesi çıkarmak için kullanılır.
Gerekli Malzemeler Listesi
Arduino
USB Bağlantı Kablosu Breadboard
Buzzer
100 Ohm direnç Jumper kablolar
Nota ve Frekans Bilgisi
Her sesin kendine ait bir frekans değeri vardır. Müzikte kullanılan notaların da kendilerine ait frekans değerleri vardır. Frekans yükseldikçe/arttıkça daha tiz bir ses çıkar. Notaların frekans değerlerini öğrenmek için aşağıdaki linkte yer alan listeyi kullanabilirsiniz.
Notalar, isim olarak da harf olarak da gösterilebilir. Do – Re – Mi – Fa – Sol – La – Si
C- D – E – F – G – A – B
Uygulama - Notalar
Bu uygulamamızda, müzik dersi ile ilk tanıştığımızda öğrendiğimiz notaları arka arkaya çalarak bir melodi oluşturacağız. "do-re-mi-fa-sol-la-si-do”
Kodlarımızı yazarken notaların isimleri ile değil harfleri ile çalışacağız. İsimlerle çalışmak istersek kodlama sırasında değişken adı olarak do kullanamayacağımızı unutmamak gerekir. do sözcüğünün programlamada özel bir anlamı vardır, anahtar kelime olarak tanımlanmıştır ve do-while döngülerinde kullanılır. Programlama dilindeki anahtar kelimeler değişken adı olarak kullanılamazlar.
Arduino Devre Şeması
Proje Kodları
#define buzzer
A1
// notaların frekans değerleri
int
C = 262; // do
int
D = 294; // re
int E = 330; // mi
int F = 349; // fa
int G = 392; // sol
int A
= 440; // la
int B = 494; // si
int Cc = 523;
// do (ince)
//notalar üzerinde rahat hareket edebilmek için notaları bir diziye topluyoruz.
int []notalar = {C, D, E, F, G, A, B, Cc};
int notaAdedi = 8;
//başlangıçta bir defayamahsus çalışacak olan kod bloğu (setup)
void
setup()
{
// Tüm notaları sırayla çal. İki nota arasında yarım saniye (500 milisaniye) boşluk bırak.
for(int
i = 0; i < notaAdedi ; i++)
{
tone(buzzer,notalar[i]); delay(500); noTone(buzzer); delay(20);
}
}
// başlangıç kodları (setup) çalışıp
tamamlandıktan sonra tekrarlı şekilde
çalışacak olan kod bloğu (loop)
void
loop()
{
}
Kodların Açıklaması
Her notanın frekans karşılığını, uygun isimde bir değişken tanımlayarak hafızaya çıkardık. Değişkenler, programlama yaparken hafızada bilgi tutmak için kullanılır. Amaç, ihtiyaç olduğunda o bilgiyi tekrar kullanabilmeyi mümkün kılmaktır.
Hafızadaki nota bilgilerine do notasından ince do notasına doğru sıralı bir şekilde ulaşmamız gerekeceği için bu bilgileri bir dizi (array) içerisinde topladık. Programatik olarak dizi elemanlarına sırayla erişmek için basit sayaç mantığı kullanılır ve her seferinde 1 artırarak sıradaki elemana ulaşılır. Bunu sağlamak için diziler üzerinde for döngülerini kullanırız.
for döngümüzü hazırladık, dizi içerisindeki her elemana (her notaya) tek tek eriştik ve tone fonksiyonunu kullanarak buzzerdan uygun frekansta ses çıkardık. tone fonksiyonu
çalıştığında, dur komutu gelene kadar aynı tonda ses çıkarmaya devam eder. Biz her notanın yarım saniye (500 milisaniye) boyunca çalmasını ve sonra durmasını istiyoruz.
delay fonksiyonuna parametre olarak 500 değerini vererek çalıştırdık ve Arduino kartımızın 500 milisaniye yani yarım saniye boyunca hiçbir şey yapmadan beklemesini sağladık. Bu 500 milisaniye boyunca notamızı duymaya devam ettik.
Sonrasında, noTone fonksiyonu ile buzzerdan çıkan sesi kestik. Eğer arada delay fonksiyonunu kullanarak 500 milisaniye bekleme yapmamış olsaydık, notayı çal (tone) komutu ve sessiz ol (noTone) komutu arka arkaya çalışacağı için belki de notayı hiç duyamayacaktık.
Son olarak, bir nota bitip diğer notaya geçmeden önce arada 20 milisaniyelik minik bir es veriyoruz. Bunu yapmak için de yine delay fonksiyonunu kullandık.
Arduino Kart Nasıl Çalışır?
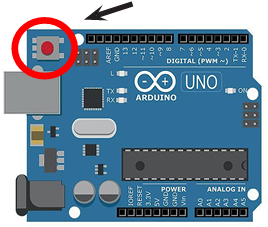
setup fonksiyonu, Arduino kart çalışmaya başladığında (elektrik aldığında) bir defaya mahsus olmak üzere çalışır. setup fonksiyonunun çalışması tamamlandığında, loop fonksiyonu çalıştırılır. loop fonksiyonu her tamamlandığında tekrar çalıştırılır. Arduino kartın enerjisi kesilene kadar ya da bir dış etken kart üzerindeki reset butonuna basana kadar bu tekrarlı çalışma devam eder.
Uygulamanın Çalışması
Bu örneğimizde loop fonksiyonunu kullanmadık ve kodlarımızın tamamını setup fonksiyonu içerisinde yazdık. Arduino kartımız elektrik alıp çalışmaya bağladığında setup fonksiyonu içerisindeki kodlar çalışacak ve notalar baştan sona duyulacak. Sonrasında sessizlik olacak. Çünkü setup içerisinde her notanın sadece bir kez çalınması için kodlar bulunuyor ve loop fonksiyonunda herhangi bir kod yer almıyor. Aynı notaları tekrar duymak için Arduino kartımızın elektriğini kesip tekrar verebiliriz ya da kart üzerindeki reset butonuna basabiliriz.
Görev
Aynı melodinin sürekli çalmasını istiyoruz. Melodi tamamlandıktan sonra tekrar başlamadan önce 3 saniyelik bir sessizlik olmalı. Aynı devre şeması kullanılabilir fakat kodların ihtiyacımıza uygun şekilde düzenlenmesi gerekiyor. Bu görevde size başarılar.
http://www.ercanbozkurt.blogspot.com ercanbozkurt.c64@gmail.com
Bu yazı Çırak Dergisi 6. sayısından alınmıştır.